Replacing the internal WLAN module: Difference between revisions
Jump to navigation
Jump to search
| Line 35: | Line 35: | ||
# That's pretty much it! If your WLAN router uses MAC filtering, you need to enter the MAC address of the new stick into its MAC address table, before the radio can connect. The radio will have kept your WPA/WEP keys in case you use encryption. | # That's pretty much it! If your WLAN router uses MAC filtering, you need to enter the MAC address of the new stick into its MAC address table, before the radio can connect. The radio will have kept your WPA/WEP keys in case you use encryption. | ||
# Enjoy! | # Enjoy! | ||
[[image:Imp_twisted.jpg|The IMP, ready for assembly with twisted speaker cable]] | |||
=Alternative solutions= | =Alternative solutions= | ||
Revision as of 15:24, 27 September 2008
In some circumstances, in particular when trying to fix the IEEE 802.11n Problem, it might be necessary to replace the network device build into most Reciva powered Internet radios. The necessary procedure is decribed here based on a Magicbox IMP, which is almost identical to the AE, two radios prone to the IEEE 802.11n Problem.
Opening the radio
The procedure for opening the AE is described here. It is virtually identicl to the Magicbox IMP, described below and shown in the pictures.

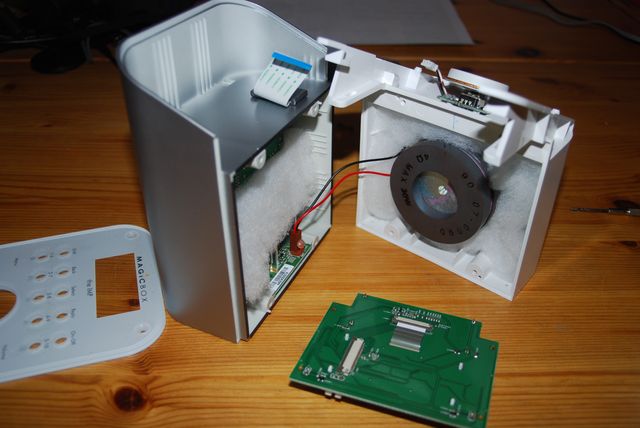
The IMP, partly disassembled.
- Disconnect the radio from the mains/power adapter!
- Remove the rubber mat from the base of the radio. It's best to remove it completely for easier removal of the front cover. However, it might sufice to loosen it over the three screw holes and flaps of the front cover (see below).
- Remove the four hexagon socket (Allan) screws at the top of the Radio, then remove the transparant front cover.
- Remove the six small crosshead (Phillips) screws (three at the top, three at the base) holding the front cover of the radio, the remove the metal front cover.
- Remove the plug connecting the jog dial with the top PCB, then the four small crosshead screws holding the PCB.
- Now comes a bit tricky bit: Carefully turn the top PCB over to the right, thus not stressing the flat cable connector underneath. There is a wedgeshaped spline underneath the cable. You can remove it by pushing the two tiny noses left and right of the cable away from the connector. Use a small, but not too sharp screwdriver or similar tool to do this. Now the top PCB can be removed completely
- Remove the two larger crosshead screws on the top and four further crosshead screws hidden in the recesses on the back of the radio.
- Now you can carefully pull the front part of the radio from the back. Be carefull, they are still connected by the speaker cable. It's best to open the radio like a book, i.e. turn the front part by about 90 to 120 degrees to the right. Remove the piece of foam from the back part.
- If you just want to swap the WLAN module, you can probably leave the front and back parts connected. However, working is more comfortable if you disconnect the speaker by removing the glue on the socket of the base PCB connecting the speaker and unplugging it.
- Now remove the four crosshead screws holding the main PCB (the Barracuda module).
- Pulling out the PCB stack is a bit tricky again, becase the flat cable fed through the top of the back part is very rigid. If you gently push it inwards as far as possible without feeding it through the mantle holding it, you'll have enough cable to gently pull out all the PCB from the back part of the radio.
Replacing the network module
- First, you need to remove the old radio module. In case of the IMP, it's just an ordinary USB WLAN stick without housing. It is plugged into the USB connector of the back PCB. It may be quite hard to remove, because you don't have any handle on it, but it is not screwes/glued to the main PCB - just pull hard!
- The further procedure depends a lot on what you want to do. If your 100% sure that your replacement WLAN module will work, follow the steps described below. Otherwise, it might be wise to connect and USB extension cable to the usb port, put the main PCB back into the back part of the radio and connect the speaker, ther top PCB and the jog dial in order to verify that your new module will actually work. Obviously, you need to be carefull when operating the radio partyl disassembled!!!
- Remove the new USB WLAN module from its casing. Obviously this depends on the module you've got. The picture shows opening the Edimax EW-7318UG, which works fine with all tested firmware versions and is not affected by the 802.11n problem. Opening it is described here:
- Push in the little flaps close to the USB plug. I broke them, but assuming you don't want to sell it later on, this shouldn't matter.
- There are two further click connectors on the side of the module, you need to push open with a screw driver.
- After unfastening all click connectors, you can remove the top part of the casing from its top.
- Now verify that it has indeed the RT25xx chipset!
- Remove the glue clsoe to the USB connector holding the PCB in the bottom part of the housing and then remove the PCB from the housing.
- Plug the replacement USB WLAN module in the USB plug of the back PCB of the radio.

Assembling and configuration
- Before you assemble everything, make sure you know the MAC address of the new WLAN stick. In case of the Edimax module, it is actually noted on its casing. Otherwise, you might have to read it out by connecting the new WLAN module to a computer and using ipconfig.
- It's a good time to verify that everything works as intended by connecting all the PCBs back together and connecting the radio to the power adapter (see above). Be carefull though, if operating the radio (partly) without its casing!
- If everything works fine, unplug the radio again and assemble it. Just follow the steps described above in the opposite order. When reconnecting the spaker cable, it might be worth twisting it a cable of times. A twisted cable arranged well away from the WLAN stick is less susceptible to the crackle problem described on the Reciva forum.
- That's pretty much it! If your WLAN router uses MAC filtering, you need to enter the MAC address of the new stick into its MAC address table, before the radio can connect. The radio will have kept your WPA/WEP keys in case you use encryption.
- Enjoy!
